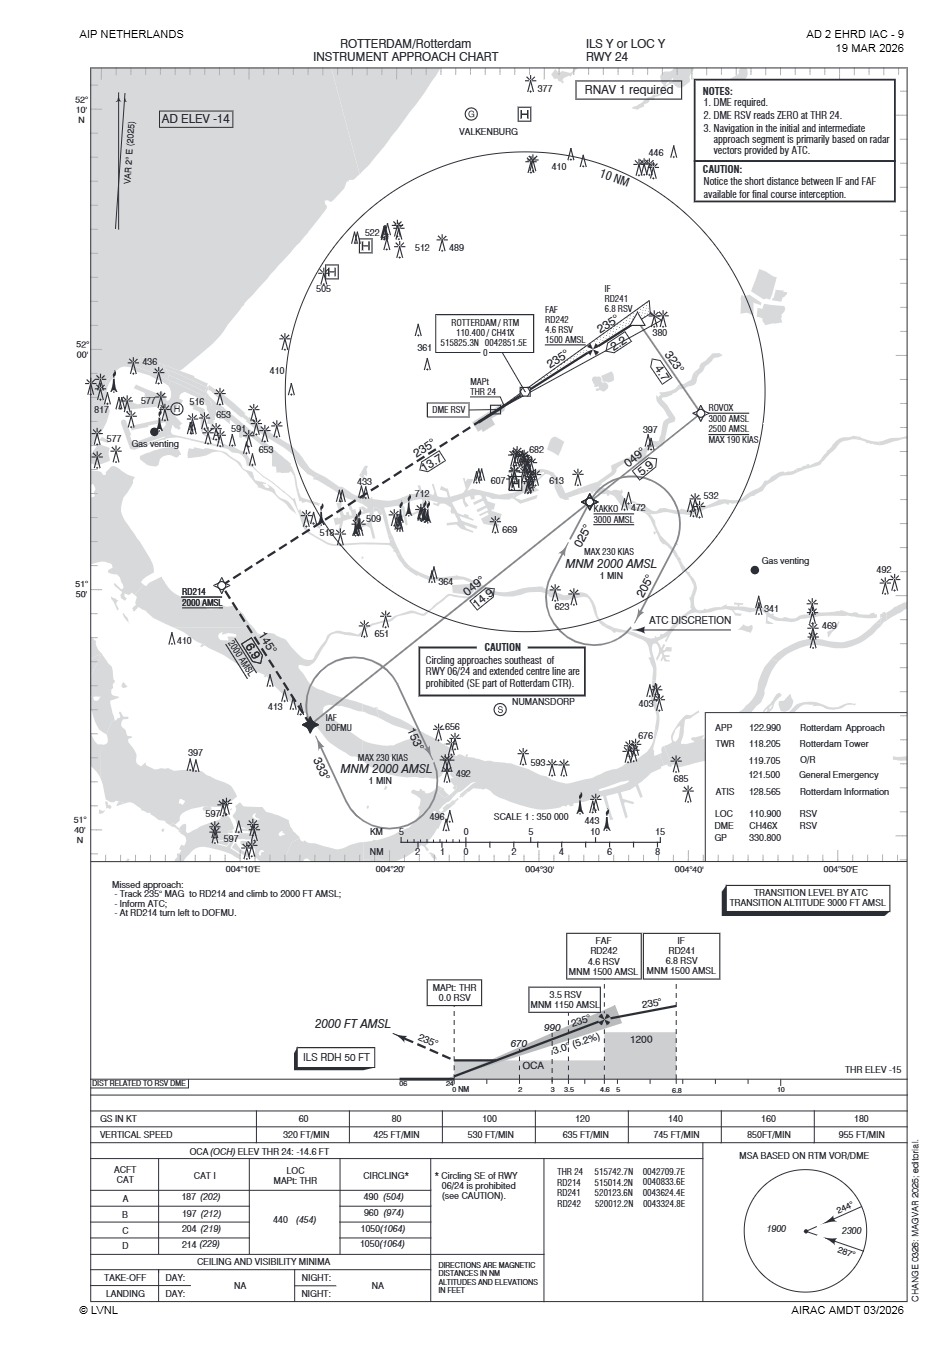
The AIP Netherlands version of the ILS Y / LOC Y RWY 24 approach at Rotterdam is a beautifully structured, highly procedural chart. Compared to Jeppesen, it’s cleaner, more “ICAO‑standard”, and gives sim pilots a crystal‑clear view of the vertical and lateral profile.
But it also hides a few traps:
Below‑sea‑level elevations
A short IF‑to‑FAF distance
Mandatory altitude constraints
A holding pattern that looks simple but isn’t
Circling restrictions
A missed approach that requires discipline
And a DA(H) table that confuses many sim pilots
This blog breaks down every section, every number, and every decision point — in the signature SimFlyingDutchman style.
🧭 1. Approach Overview — What You’re Actually Flying🧭
This is an ILS or LOC approach to RWY 24:
ILS Y → full glideslope
LOC Y → localizer only (glideslope out)
Both share the same lateral path, but vertical guidance differs.
Final Approach Course: 235°🧭
This is the runway centerline. Everything in the procedure is built around this track.
Navigation Aids🧭
LOC/ILS RSV — 110.9 MHz
RTM VOR/DME — 110.4 MHz
RSV DME is calibrated to zero at the threshold.
🛬 2. Minimums — Which DA(H) Do You Set?🧭
This is the part sim pilots often get wrong.
✔️ If flying the ILS (glideslope available)🧭
Use the OCA/OCH for ILS:
Category A: DA(H) 187 ft / 202 ft
Category B: DA(H) 197 ft / 212 ft
Category C: DA(H) 204 ft / 219 ft
Category D: DA(H) 214 ft / 229 ft
Airbus rule: You set DA (the altitude), not the height.
Example for Cat C: Set 204 ft BARO on the FCU.
✔️ If flying LOC only (glideslope out)🧭
Use the LOC OCA/OCH:
LOC MDA(H): 440 ft / 455 ft
Airbus rule: You set MDA (not DA) because there is no decision point — you descend to MDA and level off.
✔️ If flying CDFA (recommended)🧭
Use the same 440 ft but treat it like a DA:
Set 440 ft BARO
Fly a continuous descent
Go around at 440 ft if no visual reference
✔️ Circling🧭
Circling southeast of RWY 06/24 is prohibited.
📡 3. The Fixes — IF, FAF, and the Short Intercept🧭
IF — FR24I🧭
This is the Initial Fix. Altitude: 2000 ft Speed: MAX 230 KT
FAF — FR24F🧭
This is the Final Approach Fix. Altitude: 1500 ft Distance: D4.6 RSV
Why this matters🧭
The distance between IF and FAF is short. The chart explicitly warns:
“Notice the short distance between IF and FAF available for final course interception.”
This means:
ATC will vector you late
You must be configured early
You must capture the localizer quickly
You must be ready to descend at the FAF immediately
Airbus technique: At 2000 ft approaching the IF, be in:
CONF 1 or CONF 2
SPEED 180–200 KT
LOC armed
APPR armed (if cleared)
📉 4. Vertical Profile — The Glidepath in Detail🧭
The profile view shows:
FAF: 1500 ft
3.00° glideslope
TCH: 50 ft
Threshold elevation: –15 ft
Recommended altitudes:
D6.8 RSV — 591 ft
D4.6 RSV — 516 ft
D3.5 RSV — 397 ft
D0.0 RSV — 0 ft
These are check altitudes — if your aircraft shows wildly different numbers, you’re not on the correct glidepath.
🛫 5. Missed Approach — The Exact Procedure🧭
The missed approach is simple but must be flown precisely:
1. Climb straight ahead on 235°🧭
Maintain runway track.
2. Climb to 2000 ft (MANDATORY)🧭
This is a protected altitude. Do not turn early.
3. At RD214, turn LEFT to DOFMU🧭
This aligns you with the missed approach corridor.
4. Expect radar vectors🧭
Rotterdam ATC often takes over quickly.
🌀 6. Holding Patterns — Where and How to Hold🧭
The chart shows two holding patterns:
Holding at RTM VOR/DME🧭
Inbound track: 049°
Outbound: 229°
Minimum altitude: 2500 ft
Maximum speed: 230 KT
This is the main holding pattern for arrivals.
When used?🧭
ATC delay
Weather deterioration
Traffic spacing
Training flights
Airbus technique🧭
Set NAV mode
Use HDG for entry
Use SPEED managed (green dot or 210 KT)
Maintain 2500 ft unless cleared otherwise
Holding at DOFMU🧭
Inbound track: 205°
Minimum altitude: 2000 ft
Maximum speed: 230 KT
This is used primarily for:
Missed approach sequencing
Traffic management
IFR training
🗺️ 7. MSA — Minimum Sector Altitude🧭
Based on RTM VOR/DME:
Highest sector: 817 ft
Lowest sector: 397 ft
Most sectors: 400–700 ft
This ensures terrain clearance within 25 NM.
⚠️ 8. Circling Restrictions — Why You Can’t Circle Southeast🧭
The chart states:
“Circling approaches southeast of RWY 06/24 and extended centre line are prohibited.”
Reasons:
Rotterdam CTR
Obstacles
Urban density
Noise abatement
Short runway environment
In the sim you can do it — but the procedure says you shouldn’t.
📞 9. Frequencies🧭
ATIS — 128.565
Approach — 122.990 / 131.155
Tower — 118.205 / 119.705
Information — 121.705
🧩 10. Operational Notes🧭
DME or RNAV required
ILS DME reads zero at threshold
Radar vectors expected
Short intercept distance
MAX 230 KT in initial segments
MAX 190 KT on final
Transition altitude: 3000 ft
Airport elevation: –14 ft
Threshold elevation: –15 ft
source of the chart: INSTRUMENT_APPROACH_CHART_ILS_Y_OR_LOC_Y_RWY_24.pdf